Showing posts with label Tutorials. Show all posts

Sunday, November 6, 2011

Paper Bead Bracelet


A while ago I posted about these paper buttons that I'd recreated from a tutorial seen on Splitcoaststampers.  Unfortunately, I don't often have much of a use for buttons.  Beads, however, I can always find a place for.  The steps are similar, just adapted slightly.


Punch out eight circles from card stock and two circles from decorative or scrap paper (1).  Glue four of the card stock circles and one decorative circle in a stack.  Repeat with the remaining circles (2).  Varnish and age the bead halves.  I mixed a little bit of wood stain in with the varnish to achieve the antique effect (3).  Glue a thin piece of wire to the back of one of the bead halves (4) and glue the halves together.  Clamp the bead until the glue dries (5).  Apply several coats of varnish to the bead and hang to dry (6). Finally, clip off any excess wire and bend it into loops on the side of the finished bead.

Monday, October 31, 2011

Coffee Filter Chinese Lanterns


Happy Halloween!

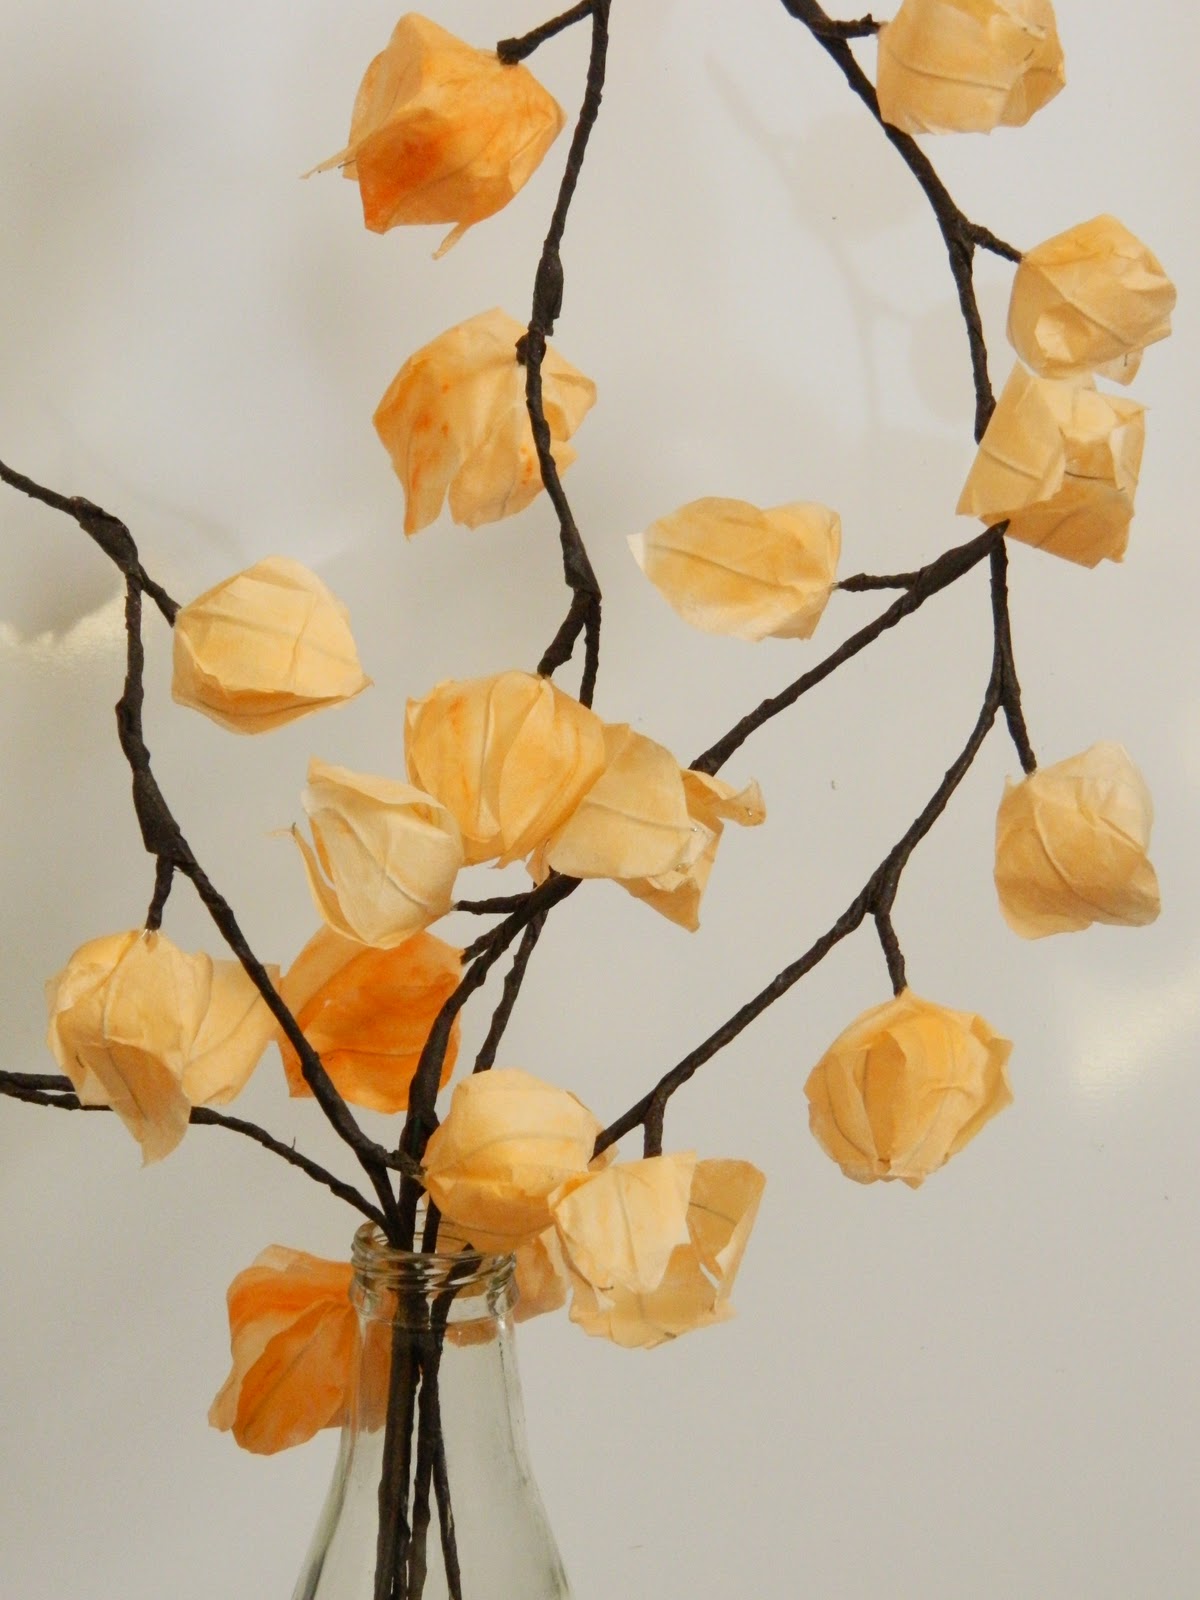
Look!  A seasonally appropriate post!  Unfortunately, this post doesn't technically fit into the series of coffee-filter flower experiments, since these aren't really flowers. According to Wikipedia, the papery lanterns are actually the plant's fruit.  Regardless, they are charming and feel very 'fall'. 


The lanterns are very easy to make (I think I say this about all of my projects). Cut out four-petaled shapes from coffee-filters (1).  You can experiment with different sizes; I just folded a large coffee filter into fourths and then cut out the rudimentary shape.  Using watercolor paints, color the 'flowers' orange (2).  Allow them to dry.  Pierce a hole in the center of the 'flower' (3).  Next, cut out four 3-3.5 inch sections of thin wire (4).  One inch from the top, wrap the wires together (5).  Wrap this inch in brown floral tape (6).  Insert the taped section through the hole in the 'flower'.


Spread out the four wire sections to line up with the four petals (7). Using masking tape, tape each wire to the middle of each petal (8 & 9).  Trim any excess wire or tape that extends past the end of the petal. Finally, bend the petals downward to form the lantern shape (10).  Attach them in a row to a thick piece of floral wire using more brown floral tape (11).


I hope you enjoy making these and I hope you all have a safe and happy Halloween!

Friday, October 28, 2011

Coffee Filter Daisies


In one of her movies, Meg Ryan says that daisies are the friendliest of the flowers.  On this subject, as with many issues, I agree with Meg.   There is something so cheerful and bright about the plant!  So, in the midst of a time filled with ghosts and ghouls, severed hands and spiderwebs, I thought I'd make a few dozen daisies to help offset the fear with some friendliness.


The basic flower is rather simple and pretty easy to make in bulk.  I think that the separate center helps give the flower some dimensionality and depth.  To make the center, cut out several quarter-sized circles from a coffee filter (1).  Next, fringe the edges of the circles (2). Twist a loop at the end of a piece of thick wire (3) and slide 7-8 circles onto the wire (4 & 5).


Cut out a quarter-sized circle from card stock (6) and cut a slit in it (8).  Form a cone with the circle around the wire stem (8 & 9).  Slide the cone up to meet the rest of the center (10) and color it a vibrant yellow with markers or watercolor paints (11). 


With the center completed, we now want to focus on the petals.  To save time on tracing and cutting, I fold the coffee filter in half (13), and then into quarters (14).  Next, I fold the resulting fourth of a circle in half (15) and then in half again (16).  One of the edges will give you a pretty good guide to the size of your petals. Cut out thin, slightly rounded petals (17 & 18).


One coffee filter should produce four 'flower layers'.  After applying glue to the base of the flower center (20), slide the layers onto the stem. Press the top layer to the center to form a cohesive flower (21).  Then wrap the stem tightly in floral tape and you're finished.  Make a dozen of these and you'll have a touch of spring to counteract the spookiness of the season!

Tuesday, October 11, 2011

Watercolor lilies


This was a project that I actually completed a while back.  And since we obviously don't care about seasonality over here at Paper Pendulum, I thought I'd go ahead and post it! When searching the internet for inspiration for more coffee filter experiments, I came across some beautiful pictures of oriental lilies. However, the coloring of these flowers was a little too detailed for the coffee filter medium.  Watercolor paper, on the other hand, worked rather well.

The materials are pretty basic: watercolor paper, watercolor paints, floral wire, floral tape, and thick green paper. I found I was able to make two flowers out of a single sheet a paper, making up for the added cost of the paper.  


First, cut out the rudimetary petals of the lily.  They should be about 3.5 inches long and 1.5 inches at their widest.  One end should come to a narrow point and the other should be rounded. You will need 6 petals for each flower. If you draw a template on plain cardstock and then the petals onto the back of the watercolor paper, you can cut down on wasted paper (1).  Next, comes the actual painting.  Remember to paint on the correct side of the watercolor paper!  You can of course tailor the coloring of flower to your own tastes. I first painted a wide swatch of pink/red in the middle (2). Next, using a finer paint brush, I colored the center a darker pink.  At the pointed end (the one that will be the center of the flower) I painted a triangle of yellow (3).   After letting the petal dry, I made a series of pink dots; more concentrated at the center, the distance between the dots slightly increased as I worked my way up the petal (4).


Next, using the scrap water color paper, I cut out 5-6 thin 1.5-2 inch strips.  These were colored yellow on both sides and allowed to dry (5).   After being arranged in a bundle the strips were attached to the floral wire with floral tape.  A thin dowel was then used to curl the ends of the strips (6).  The petals were then attached around the center of the flower.  Three petals should be attached first in a group.  The last three should be arranged in the gaps between the first three petals and then fastened down with floral tape (7).  Using the dowel, I carefully curled the petals downward (8).


After you're done, the flower should resemble the one in step 9.  Finally, cut out long, thin leaves from the green cardstock.  Bend them slightly in the middle (10).  Attach two to the stem of the flower and cover the rest of the wire in floral tape (11).  Bend the head of the flower slightly downward, and you're finished!

Sunday, October 9, 2011

Paper Fans


Now, I realize that fall is probably not the best time to make paper fans.  However, down here in New Orleans it still feels like summer!  Besides, all the DIY brides out there can get an early start making fans to hand out during their summer ceremonies!  So despite this project being off-season, I'm pretty proud of it; the materials are cheap, and the final result is rather adorable. Unfortunately, since they are made of paper, the finished fans are somewhat delicate.  In future experiments, I hope to substitute the paper with fabric to try and make the fan a little more durable. 


As I mentioned, the materials needed for this project are very cheap.  A package of skinny sticks (I bought mine from Walmart), a 12 x 12 sheet of decorative paper (double sided would be best), craft glue, a pin, sand paper, a hammer, scissors, a bone folder, and a pair of pliers. The first step is to sand the rough edges of seven skinny sticks.  Stack them so that the ends meet up.  Next, insert a pin about in inch from the end of the sticks. This step is actually the hardest part, because you need to avoid splitting the wood of the slender sticks. My solution to this problem was to use a pin as a nail and hammer it through the skinny sticks.  However, I bent a lot of pins using this technique, so a very slender nail or drill bit might work better. Once the pin is inserted through all seven sticks, bend the end to form a loop (my picture actually is from a fan made with 8 sticks).


The next part doesn't have to be exact. Measure a point 5 inches diagonally located from one corner of  the 12 x 12 paper. Draw a line 6 inches from that point in either direction. Get as close to the edge of the paper as you can. The angle of the two lines should be 160 degrees or so. Again, it doesn't have to be exact. Cut along the two lines.  Next, fold the paper like an accordion in a series of slender triangles with a width of about 1 inch.  The apex of each triangle should be close to the point you measured earlier (this also doesn't have to be exact).  Use the bone folder to get nice and crisp folds.  Make sure that all of the triangles have the same width.


The peak of the final triangle might not meet the point of the other triangles.  Cut off this section and the one next to it.  You should be left with 14 triangles.  Snip off the bottom 3 or so inches closest to the apex.  Line up your fanned out paper with the pinned together skinny sticks.  The head of the pin should be facing downward (toward the side you want to be the outside of your fan).  Each stick should correspond to every other triangle.  Visualize how the fan will close and make sure that your arrangement makes sense.


Start glueing the sticks down.  About 3-3.5 inches of the stick should overlap with the paper.  You can play with this; the more stick overlapping with the paper, the more fanned out the finished fan will be.  Continue glueing the sticks down.  Make sure and line up each stick with the one below it.  Remember, there should be a fold of paper between each stick!  Glue down the leftover flap of paper to the final stick. 


When the fan is folded up, cut off the top of the fan to form a level surface.  Open up the fan, and you're done! 

Obviously, you can play with these steps to customize your fan.  Attach a string of beads or some other bauble to the bent loop of the pin.  Scallop the edges of the fan.  Vary the number of sticks or play with the size of the paper. You could even use personalized paper with a photo printed on it. Just let me know how they turn out!


Sunday, August 7, 2011

Coffee Filter Hydrangeas


Since the most popular posts seem to be those concerning coffee filter flowers, I thought I'd try to experiment with a few more types of flowers.  I've always liked hydrangeas; every time I enter Whole Foods and see the blue-green potted plants featured in the flower display, I have to sternly remind myself that anything dependent on me for food and water would die within a week. Paper hydrangeas, on the other hand, are much easier to take care of!

Materials need for this project include: coffee filters, thin silver wire, Styrofoam balls, watercolor paints, floral tape, green paper, and thick floral wire.


To begin, you need to cut out a large number of four-petaled flowers. They should be about 1.5 inches in diameter (1).  Next cut 1 inch pieces of wire and bend them into a narrow "U" shape (2). Insert the wire through the center of the flower (3). Small pins would work just as well if you want to skip step 2.  Attach the flowers to the Styrofoam ball in an overlapping pattern (4).  Make sure the ball is completely covered.  If you want to cover the ball first in coffee filter paper, you can avoid any unseemly white patches in your finished project. 


Paint the flowers in a mixture of blue, green, and purple hues (5 and 6). After the ball dries you will need to "fluff" the matted down petals. Finally, cut out a broad leaf from green paper and attach it to floral wire with floral tape.  Insert the wire into the base of the ball and you're done! I used rather small Styrofoam balls in my project because that's what I had on hand. After grouping three of the flowers together and pinning the sides together with wire, I think it came out rather cute.  A larger Styrofoam ball might work better and appear more realistic.

Let me know how your flowers turn out!

Sunday, June 12, 2011

Coffee Filter Gladioli


These gladioli are the result of yet another coffee filter flower experiment. They are very simple to make if not slightly time consuming.  The basic components are coffee filters, floral tape, floral wire, and watercolor paints. 


To form the buds of the plant, I bunched up a small piece of scrap filter paper (2). After wrapping floral tape around the base of the pinched paper (3), I attached it to a 12 inch long piece of 16 gauge floral wire. Several more buds, made in a similar manner, were then attached to the wire in an alternating pattern (4).  The amount of exposed paper in the buds should gradually increase as one continues down the wire.


In order to make the flowers, I needed to cut out several circles of filter paper. I freehanded the designs, cutting wavy edges around the perimeter of the circles (6).  The circles ranged from around 1.5-2 inches in diameter. After layering two of the circles, a piece of 26 gauge wire was looped through the middle of the circles (7). The circles were then pinched around the wire and one of the ends was wrapped around the base of the flower (8).  Floral tape was wrapped around the exposed wire (9) completing the rudimentary flower. Next, I attached the flowers in increasing size in the same alternating pattern as before (10 & 11).


Paint the petals of the flowers and the buds with watercolor paints in hues of red, orange, and yellow. And you're finished, a fresh bouquet of coffee filter gladioli of your very own!

Sunday, June 5, 2011

Paper Bowls


This is yet another project designed to use up superfluous paper: the paper bowl.  I really need to get more creative with these names...

Anyway, this is a pretty simple project that I'm sure has been done before countless times.  However, I'm going to put out on the Internet one more tutorial on the subject. The bowls can be used individually but I really liked how they looked with a glass globe nestled inside.  The top picture also shows off the paper cherry blossoms that I've been working on (post pending).

1. The first step involves wrapping your container of choice (a glass globe or vase for instance) in saran wrap.  I tried aluminum foil first but saran wrap was much easier to remove from the finished bowl.
2. Cut out strips of paper, mine were about a centimeter wide and 15 centimeters long. 

3. Brush mod podge on the back of each strip of paper and lay the strip on the saran wrap.  

4. Continue laying the strips of paper in an overlapping pattern.

5. After you finish laying the strips apply a few more coats of glossy mod podge.  Allow the bowl to dry for a few hours. Finally, remove the bowl from the saran wrap lining.


Monday, May 30, 2011

Miniature Paper Boxes

Channeling my love for fake food and tiny things, my sister bought me a set of miniature food jewelry for my birthday. While I am planning to write a future post showcasing these adorable creations, this entry focuses solely on their packaging.

One of the items was obtained from PetitPlat, a website the features food art and jewelry by Stephanie Kilgast. The packaging is almost as adorable as the contents.  For my latest craft project I thought that I would try to reproduce the miniature paper boxes. 

Overall, the project was pretty simple. Cut a 3.5 in x 3.5 in square and a 3 in x 3 in square out of cardstock.  The size of the square will obviously determine the final size of the box; however, regardless of the dimensions of the squares, one needs to be at least 1/2 a square inch smaller in size. Then follow the folding pattern outlined in the pictures below with both squares of paper.  


Glue the folded flaps onto the base of the box.  The larger square becomes the lid of the box with the smaller serving as the bottom. Feel free to embellish the final project with ribbons and buttons. 

The finished product

Thursday, May 5, 2011

Chandelier Earrings

As you might have figured out by now, I tend to change projects pretty often. Some might claim that this represents a lack of focus, a fear of commitment, restless hands syndrome, etc. 

Personally, I think it indicates an explorer's spirit, the thirst for uncharted territory. Boldly going where no Linda has gone before.

However, I do have certain craft staples, projects or art forms that I keep coming back to.  One of my most enduring craft interests is jewelry making, earrings being a personal favorite.

So this is going to be a series. Every post will center around a different earring style of my design (or a style that I attempt to recreate).

Chandelier Earrings:

*Warning:  I am just an amateur jewelry maker so some of the terminology/descriptions might not be accurate.  Please don't hesitate to correct me.  That's how we learn!

Raw materials


Things you will need:

Crimp Beads
Beads (small, medium, and large sizes)
Fishhooks/French hooks
Wire/headpins/eye pins
Jump rings


The basic framework for the earring
 The framework of the earring is pretty simple. You take a length of wire or a head pin with the base clipped off, feed 3 crimp beads onto the wire, and then fold the ends into loops.  Bend the wire into a "U" shape.  Flatten the crimp beads slightly with pliers then feed the jump rings into the crimp beads.  Flatten the crimp beads further.  Finally, feed a jump ring  through the loops at the top of the "U".
The s-m-s "charms"
 Place three beads on a wire either in the pattern of small-medium-small (you will need 6 of these) or medium-large-medium (you will need 2 of these).  Using pliers bend the both ends of the wire into loops.

Fasten the m-l-m "charm" onto the middle jump ring at the base of the "U". All of the other jump rings, including the one joining the top of the "U" receive a s-m-s "charm". Let me know how they turn out!

The finished product

Sunday, May 1, 2011

Paper Beads


Since I tend to go slightly overboard when shopping at Michaels (as my boyfriend can attest to) over the last few months I have accumulated several 12 x 12 pads of designer paper. I just can't resist the all the pretty colors! A portion of this paper was alloted for paper flowers (post pending) but since I still have several hundred pieces of paper left I thought I would try my hand at making paper beads.

Step 1: Cut elongated triangular shaped pieces of paper
I prefer paper that contains at least 3 seperate colors. The piece shown to the right was obtained from Recollections's Fashionably Chic Collection. 

Now, this is my first official craft post.  Bear with me... 

The first step involves cutting a long triangular piece.  I tend to free hand a lot of my designs, so the dimensions aren't quite exact.  The base width will determine the length of your bead (mine are approximately a centimeter).  The length will determine how thick the final product is ( mine are about 7 inches long).

Step 2: After applying glue, roll paper around wire
After applying a thin layer of glue to the back surface of the paper strip with a glue stick, start to role the paper around a thin rod.  I originally tried bamboo skewers but I felt the resulting bead had too wide of a opening.  I found that 16 gauge floral wire worked much better.
Step 3: Keeping the paper centered, finish rolling the bead.

 Continue to roll the paper around the wire.  Make sure to keep the tip of the triangle centered in the middle of the bead.  Upon reaching the end of the paper apply a dot of glue (I've been using Elmer's Craft Bond Paper Craft Glue Gel) to prevent the bead from unraveling slightly.

Varnish the finished bead with your sealer of choice.  After one coat, let beads dry. Apply additional coats if necessary.


After the beads are dry, insert jewelry wire through the opening.  Using pliers, bend both ends into loops. 

Step 4: Varnish bead and finish
by bending jewelry wire into loops
And you're done.  The whole process should take about 1-2 minutes per bead.  Less if you practice. One thing, I can't really comment on their water resistance.  The varnish should provide some protection; however, I would probably not wear the finished earrings or bracelet to the waterpark. 


These beads are obviously a great way to utilize left over paper, junk mail, old magazines, etc. Recycled chic is very in these days...